Mike’s FTL stuff > Ships guide > Mantis B
Mantis B
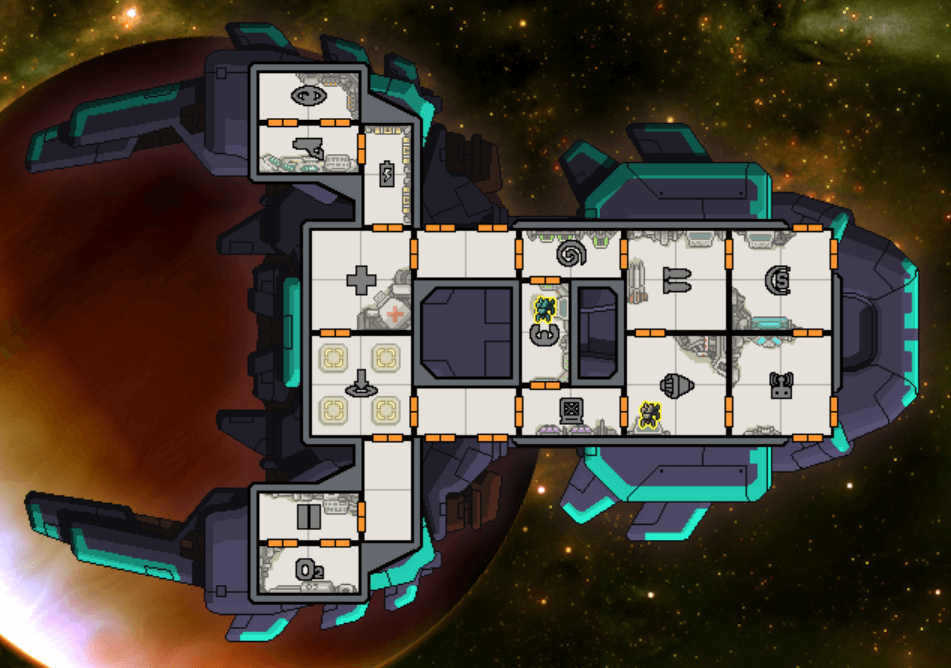
The Basilisk
The O2/doors corner is vulnerable to damage and fires. This can largely be neutralised with correct preparation. It’s possible to repair vented O2 provided you have air in the medbay and Pheromones. With an airless ship, you need a level 3 medbay to repair O2.
Despite its apparent strength, this ship is vulnerable at the start because Mantis crew are terrible at repairs and fire-fighting. Plan routes that let you revisit a previous beacon and repair after a disaster.
Mantis B’s nemesis is an Automated or Zoltan ship with a Small Bomb and Burst Laser 2. Even with perfect play, you’ll die about 1 time in 7.
The quickest fix is engines. Engines-2 increases your odds of survival to 94%, engines-3 to nearly 100% and likely to take a lot less damage. If you see an immediate store, take it. You can sell Mantis Pheromones and buy engines-3.
Read the text for events! This event is a crew fight, and this event is an Automated ship fight. They look similar, but you might want to avoid fighting an unseen Automated ship before you’ve made your ship safer.
After you’ve taken care of early-game safety, look for weapons, crew, or hacking. One-power weapons are particularly good, because you can use them immediately. A Small Bomb lets you disable enemy weapons (or medbays). An Ion Blast is cheap and lets you attack Zoltan ships.
Once you have three crew, you gain the option of using distraction tactics to break weapons (see Mantis C for an explanation).
The defence drone is unreliable at protecting shields and drones. On Hard, remove power from the drone before a missile fires, to reduce the chance of drones being targeted. Remove power from shields as well, if you don’t need them.
The boarding drone will eventually kill any Automated ship, unless it lands in an isolated piloting room. That means it can kill 90% of Automated ships, unless they are running away. With an upgraded teleporter, this becomes 100% with the help of your Mantis, but it’s not worth 30 early-game scrap. Regardless, consider avoiding nebula beacons early on.
When the drone starts leaving a room, you can sometimes make it change destination by toggling power. For example, when the drone lands in the shields room on an Auto-scout, you can force its next room to be weapons instead of piloting.
Don’t hesitate to spend drone parts when fights look dangerous. Your boarding drone is not just for Automated ships. A rapid crew-kill can be your best defence.
Leave one Mantis in piloting (to start the FTL charging immediately), and put the other in sensors. When completely safe, destroy systems for surrender offers (as low as 1 hull).
Sector 1 distress beacons are worth visiting. Even without blue options, distress beacons can give crew, and are safer on average. The Boarding Drone has a low-scrap blue option.
You also have good blue options from the teleporter and Defence Drone, but they apply to the same event. The drone is typically better, but risks system damage with a fire; and the teleporter gives a 50% chance of crew. Therefore choose teleporter unless maybe you already got some non-Mantis crew.